VIDEO: One-Layer Halloween Shenanigans with Lawn Fawn

Hi all!  I'm so happy to be back with another video to share.  Between work and this dang cold that I've had for the last few days I feel like I haven't had a chance to get my crafty fix in FOREVER!  Plus, I ran into some serious technical issues with this video and ended up recording the voice over about seven times before I finally got one to work. Oye!  But nevertheless, the project is done and I really hope you enjoy it!


This card is my entry in the Lawnscaping One-Layer Card Challenge that is going on right now.  I may have fudged the "one-layer" just a smidge by putting my panel onto a card base but I still had tons of fun creating this card.  I used a couple of Lawn Fawn stamp sets that are oldies but goodies - Monster Mash and Happy Everything - along with my brand spanking new MISTI tool and some Zig Clean Color Real Brush Markers.  To add some finishing detail but still keep in one-layer I used a fun dot technique that I picked up on Julia Altermann's YouTube channel, so go check her out!  Thanks for the inspiration, Julia!


This card came together quickly and turned out super fun!  I love love love fall and Halloween crafting so I'm hoping to get a little fall series going, mostly just as an excuse for me to craft more, so be on the lookout for that!  Thanks so much for stopping by!  The full video tutorial is linked below. Don't forget to enter the One-Layer Card Lawnscaping Challenge and I'll see you next time!  Bye!


~~~~~~~~~~~~~~~~~~~~~~~~~~~~~~~~~~~~~~~~~~~~~~~~~~~~~~~~~~~~~~
SUPPLIES:
*Amazon affiliate links used where possible

VIDEO: Have a Mice Holiday ~ Tag featuring Lawn Fawn STAMPtember Exclusives

Hi guys!  Today I have an adorable little tag featuring oodles of Lawn Fawn goodies!  I gotta tell ya, fall is my absolute favorite time of year.  I love when the leaves change color, the days get shorter, the fluffy scarves and sweaters come out, the inviting pumpkiny smells, the football, and, of course, STAMPtember!!  This month is a cardmaker's paradise as stamp companies everywhere celebrate creativity through stamping and all kinds of exclusive products come out.  I loved last year's Lawn Fawn and Simon Says Stamp Exclusive set and as soon as I saw this year's I knew I had to have it!


This Merry Christmouse set features these adorable little mice all ready for Christmas and whole load of pun-y sentiments to go with them! (*I just saw that this is sold out on Simon Says Stamp!  I still linked below just in case they decide to carry any more.  Sorry guys!)  Today I just wanted to play with this set, along with some other new purchases from the Lawn Fawn fall/winter release, to create a nice simple tag.  I'm hoping to motivate myself enough to get a jump on Christmas crafting this year (I always wait too long and can't make half of what I want to!).


This project uses some simple Copic coloring and fun, glittery heat embossing to create a sweet tag perfect for the hoidays!  I think these Stitched Circle Tags dies are going to be a staple this season!  For a full list of all the goodies I used, see below.  You can also check out the full tutorial on my YouTube channel (I'm oh-so-close to 200 subscribers and a MAJOR giveaway, so head on over and check it out!). 

 
Thanks so much for stopping by!  See you all soon with more crafty fun! Bye!

~~~~~~~~~~~~~~~~~~~~~~~~~~~~~~~~~~~~~~~~~~~~~~~~~~~~~~~~~~~~ 
SUPPLIES:
*Amazon affiliate links used when possible

VIDEO: Hey Ghoul Friend ~ Texture, Zig Marker Backgrounds & Lawn Fawn Booyah

Hi all!  I did it, I started creating Halloween cards! Eeee!!  I know, I know . . . it's only September.  But can we just all agree that Halloween and fall stamps are THE BEST????  It is my favorite time of year and I couldn't wait another minute to jump into the craftiness of it all!


Today I am sharing a project I created for the current Lawnscaping Challenge: Texture.  When I saw this challenge I instantly heard some embossing paste calling my name so I busted out the black embossing paste and a couple of stencils and just went to town!  I recently created a video where I shared a card using a background made with Zig Clean Color Real Brush Markers - BUT I already had the background made so I didn't get to share how I did it.  For this card I wanted to recreate a simple version of that background for you all.


My witchy ghost is from the adorable Booyah stamp set from the fall/winter release at Lawn Fawn (one of my all time favorite stamp companies!) and I am in love with this sassy sentiment!  To frame up my ghostie gal I wanted to use some vivid Halloween-y purples.  Creating this background is as easy as doing some Zig Clean Color Real Brush marker scribbling and then spritzing it all with water.  I recommend letting the background dry on it's own for awhile before finishing it off with your heat gun.


 A little black embossing paste for texture and this spooky background is done!  I loved creating the side strip using the same Zig marker colors and embossing paste so everything coordinates.  Also, cutting your sentiments up after you stamp them to create word squares is a great way to stretch your sentiments and get a whole new look!


Thanks so much for stopping by!  I am SOOOO close to 200 YouTube subscribers and when I get there I'm going to do a giant giveaway to thank you all for your amazing support!  Go check out the Lawnscaping Challenge: Texture and my full video tutorial above.  See you again soon! Bye!

~~~~~~~~~~~~~~~~~~~~~~~~~~~~~~~~~~~~~~~~~~~~~
SUPPLIES
*Amazon affiliate links used when possible

VIDEO: Rainbow Bling ~ Coloring Paper Smooches with Stickles

Thanks for joining me for another fabulous Paper Smooches project!  I am SOOOO excited to be back with you guys after working on the other side of the state for almost a week.  I can't tell you how much I miss creating and sharing with you all!


Today I have a really simple but super fun project using one of my favorite Paper Smooches stamp sets!  This Spectrum set is, as the high school kids my hubby teaches would say, totes adorbs! I have used the unicorn on several projects and so I wanted to see what I could do with the little rainbow image, especially since the Paper Smooches Sparks Picture Perfect Challenge for this week is uber colorful!


I opted to go with a bookmark and just keep it simple.  The background is simple Distress Ink shading with some Perfect Pearly water drops.  Then I got crazy and decided to color in the rainbow using a variety of Stickles by Ranger.  These are essentially glittery puff paints - and who doesn't remember those from their childhood??  Am I right?? 

http://papersmoochessparks.blogspot.com/2015/09/september-13-19-picture-perfect.html

The end result was a really sparkly, puffy rainbow bookmark that was a breeze to create!  This would be a really fun project to do with the kiddos since there is no complicated shading or anything and the Stickles are so much fun to play with!  Be sure to hop over to the Paper Smooches Sparks blog and enter your project for this challenge!


For a complete list of supplies used, keep on scrollin'.  For a full tutorial, click on that video above (and hit Subscribe so you don't miss any of the stamping fun!).  Thanks so much for stopping by!  Hopefully the rain will come soon so the fires can be put out and I can stay home and craft instead of working on weekends!  See you all soon!  Bye !

~~~~~~~~~~~~~~~~~~~~~~~~~~~~~~~~~~~~~~~~~~~~~~~~~~~~~~
SUPPLIES
*Amazon affiliate links used when possible

VIDEO: Balloons Galore ~ A card featuring the Simon Says Stamp September Card Kit

Hi there!  Thanks for joining me for another fun card project!  For this card I used a background that I have had sitting on my desk for weeks now and busted out my brand new September card kit from Simon Says Stamp!  


I created this background using my Zig Clean Color Real Brush markers.  I just scribbled a bunch of colors on some watercolor cardstock and then spritzed the whole thing with some plain ol' water.  It was an experiment to see how well the pens reacted with water and what types of backgrounds I could create.  I liked how it turned out so I kept it for future use, and low and behold, I was struck by inspiration when I saw the super fun doodled balloons in the Birthday Bits stamp set that comes in the September Simon Says Stamp Card Kit!


I used a fun technique that I learned from this video by Jennifer McGuire (LOVE HER!  I learn SO MUCH about techniques from her channel) on how to create a metallic finish by rubbing Perfect Pearls over Distress Inks.  I go through it step-by-step in the video so if you're interested, click the link below for my video and the link above for Jennifer's.


I really love how vibrant and whimsical (my very favorite adjective) this card turned out.  The Zig markers really created a much brighter background than I've ever been able to achieve using my Distress Inks.  I love having this as a new option for backgrounds! Since this card turned out so very colorful, I decided to enter it in the current Simon Says Stamp Wednesday Challenge which is all about color!  Go check it out!

I am headed out of town for work - I work for the Oregon Department of Forestry and I get to go help with paying some bills for the fires that were in Eastern Oregon - so this will be the last video for a little while but when I get back next week I'll be itching to create so keep an eye out!  Thanks so much for stopping by! Bye!

~~~~~~~~~~~~~~~~~~~~~~~~~~~~~~~~~~~~~~~~~~~~~~~~~~~
SUPPLIES
*Amazon affiliate links used when possible

VIDEO: Black & White Mad Scientist with Paper Smooches & Prismacolors

Happy September!  I cannot believe how quickly the time is going!  I'm getting ready to head out the door to my fantasy football draft (I LOVE FOOTBALL SEASON!!!!) so this will be a quick post but I have a fun project to share that was inspired by this video by the incomparable Sandy Allnock.

  
This is actually a very simple card, the most complicated part was trying to figure out how to best utilize my gray tones to accomplish the black and white vintage mad scientist look I was going for.  This Great Chemistry stamp set by Paper Smooches really lends itself to the old, cheesy horror movie black and white look.  I love it!  I used Prismacolors and gamsol for all of my coloring.


I love how this card turned out, especially after the finishing touches of some Pretty Pink Posh Sparkling Clear sequins and Glossy Accents were added.  This is my entry for the current Paper Smooches Sparks Anything Goes Challenge so head over there and get your entry in before the linky closes! 


For a list of supplies, keep on scrolling!  If you'd like to see a full tutorial for this card, check out the video on my YouTube channel.  Thanks so much for stopping by and wish me luck in my fantasy draft (I got the 9th pick out of 12 so I'm not too hopeful)! Bye!


~~~~~~~~~~~~~~~~~~~~~~~~~~~~~~~~~~~~~~~~~~~~~~~~~~~~~~~
SUPPLIES
  • Paper Smooches Great Chemistry stamp set
  • Prismacolor pencils - 150 set
  • Pro Art Odorless Thinner
  • Paper blending stumps
  • Neenah 110 lb Solar White Cardstock
  • Simon Says Stamp Black Cardstock
  • Ranger Archival Black Ink
  • Ranger Super Fine White Detail embossing powder
  • VersaMark ink
  • Scotch Advanced Tape Glider
  • Best Creation Foam Tape
  • Signo Uni Ball White gel pen
  • Gelly Roll black gel pen
  • Ranger Glossy Accents
  • Pretty Pink Posh Sparkling Clear Sequins in 10mm, 8mm, 6mm, & 4mm
  • Sakura Stardust Gelly Roll pen
  • Micro Glue Dots

VIDEO: Close to My Heart Edition ~ September Stamp of the Month & Striped Masked Background

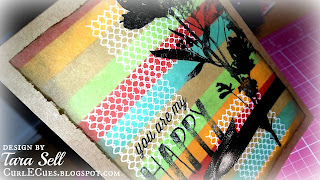
Happy hump day!  I want to share a really fun and easy background technique that I learned from watching the Quick Tip videos over at the Unity Stamp Co. Facebook page and the Close to My Heart Stamp of the Month for September is perfect for this!  This stamp set, called Paper Gardens, features all of these amazing large, solid floral silhouettes and I can't wait to experiment with different ways to use them.


For this card I combined one of the florals from Paper Gardens with a Close to My Heart sentiment and then just inked right over the top.  It did take me a few tries to get an impression I was happy with when using these brand new, super solid stamps.  After several tries I ended up using my StazOn ink and going with a less than solid image.  If you have a stamp positioning tool such as the MISTI that would be a great way to get a really solid impression with these stamps.  The distressed look went with my card theme so in the end I didn't mind a few missing areas.


For the background of this card I used this video by Angela Magnuson over at Unity Stamp Co. and this video by Angeline Choo as my inspiration.  It is a simple masking technique that you could do with any inks on any type of cardstock or surface.  Simply tape off your paper in striped segments, allowing them to overlap ever so slightly to avoid white space, and add color.  I like to use several different colors and apply them in no particular order for a more organic look.


Once that was done I distressed the edges and added some ribbon and this project was complete!  For a full list of the supplies I used, just keep scrolling.  You can watch a tutorial on my YouTube channel or click on the video above.  Don't forget to visit my Close to My Heart website so you can see all of the fabulous new releases that just came out on September 1st and pick up your Paper Gardens stamp set, only available this month!  Thanks for stopping by and I hope you enjoyed this technique!  Bye!
~~~~~~~~~~~~~~~~~~~~~~~~~~~~~~~~~~~~~~~~~~~~~~~~~~~
SUPPLIES
*Affiliate links used when available