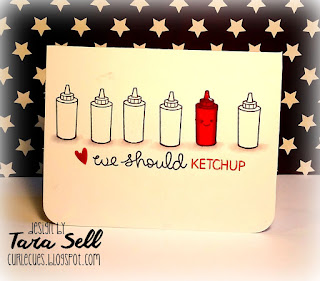
VIDEO: CAS Lawn Fawn Let's BBQ One-Layer Card

Good evening!  I gotta tell ya, this has been quite the week!  I recently started a new position at work and my brain is just fried from all the new information that is being pumped in.  I love it and I'm excited about it but man, am I tired!  And unfortunately, that cuts into my quality craft room time when I get home and just want to crawl into bed!


So, the project I have for you tonight is a nice and low-key, clean and simple, one-layer card that I was able to pull together in no time!  I used the Lawn Fawn Let's BBQ set that has been calling my name for awhile now and did some simple Copic coloring to add a pop of color to the otherwise black and white card.  Some Wink of Stella and Glossy Accents add just the right touch of pizazz to take this CAS card from mundane to fabulous!


Check out the video for all the how-to's on this project and stay tuned for a giant spring/summer haul video that I'll be posting soon.  I've been hoarding all my new goodies for several months so I figured I'd share what I've got with you all!  Alright, this tired lady is off to bed!  Thanks so much for stopping by!  For a full list of supplies, check out the space below the squigglies!  Sleep tight!


~~~~~~~~~~~~~~~~~~~~~~~~~~~~~~~~~~~~~~~~

SUPPLIES
  • Simon Says Stamp 120 pound white cardstock
  • Lawn Fawn Let's BBQ Stamp Set
  • Copic Markers (R22, R29, R89, C1, C3, 0)
  • Lawn Fawn Black Licorice Ink
  • Lawn Fawn Cranberry Ink
  • Wink of Stella Clear Glitter Brush Pen
  • Ranger Glossy Accents
  • Fiskars Corner Rounder
  • Doodlebug Sprinkles Ladybug Assortment 
  • Signo Uni-Ball Pen in white

VIDEO Close To My Heart: Happy Anniversary Card Using the Workshops on the Go Blossom Cardmaking Kit

Hello and welcome!  Tonight I have a Close To My Heart Edition post and video for you!  I became an Independent Consultant for Close To My Heart in May and I have been falling in love with all these fabulous products ever since!  So I'm excited to make CTMH Editions a regular occurrence on my blog and YouTube channel to feature some of my favorite products and hopefully provide some inspiration for all the CTMH fans out there.


Today I am using some leftover pieces from the Workshops On the Go Blossom Cardmaking Kit.  This kit comes with a lot of goodies but I must say my favorite is the stamp set that you can only get by purchasing the kit.  It has so many different elements and sentiments and is really fun to play with! The kit is designed to make 15 cards (5 each of 3 designs) but I chose to make about 10 cards and use the rest of the papers and supplies to experiment.


In addition to the Blossom kit, I used the Finding the Words stamp set and two Exclusive Inks in Pear and Smoothie for my card today.  I have listed and linked all of the products that I used below.  For a full tutorial of how I created this card, please check out the video!


Thank you so much for stopping by for my first Close To My Heart Edition post and video! You can visit my Close To My Heart website at tarasell.ctmh.com.  I hope you enjoyed this project and I'll see you next time!

~~~~~~~~~~~~~~~~~~~~~~~~~~~~~~~~~~~~~~~~~~

SUPPLIES

VIDEO Paper Smooches Shaker Card: Masking, Partial Die Cutting, Copic Coloring Extravaganza

Hey all and welcome!  Tonight I have a card for you that is jam packed full of technique-y goodness!!  All I really wanted to do here was stack these adorable Paper Smooches Chubby Chums up in front of a shaker window. When I came up with the concept for this card in my head I did not realize how in depth it was going to be but as I started to make it the time just kept going and going and my poor video camera was smoking by the time I finished filming all 65 minutes!  I managed to edit down to a reasonable length for the video but it took a lot of super fast speed because I didn't want to cut any of the cool techniques!

   
 In the end I did some partial die cutting, some masking, some Copic coloring, some craft foam shaker card making, some dry embossing, some heat embossing, some Distress Inking, and some oops fixing!  So take a look at the video below on my YouTube channel for all the juicy details on all of those fun techniques! 


I had so much fun combining all of the great things I've learned from all the time I spend watching craft videos into one fun card!  For a full list of all the supplies I used please see below.  If you like this card or this blog or this video please let me know!  I love to hear your comments and feedback!  As always, you can subscribe for more crafty fun to come!  Thank you and have a fabulous night!


 ~~~~~~~~~~~~~~~~~~~~~~~~~~~~~~~~~~~~~~~~~~~~~~~~~~
SUPPLIES 
  • Paper Smooches Chubby Chums stamp set
  • Inkadinkado Stamping Mask Paper
  • Stitched Rectangle Dies by Lawn Fawn (Large and small)
  • Stitched Journaling Die by Lawn Fawn
  • Computer Graffix Printable Transparent Plastic Sheets
  • Craft Foam
  • Pretty Pink Posh sequins (Bahama Blue, Sunshine Glow, Peridot Mist, 4mm Sparkling Clear)
  • Ranger White Super Fine Detail Embossing Powder
  • VersaMark Ink
  • Memento Tuxedo Black Ink
  • Close To My Heart Liquid Glass
  • Close To My Heart White Card Base
  • Wink of Stella Clear Glitter Brush Pen
  • Tombow Tape Runner Adhesive
  • 110 pound Neena Solar White Cardstock
  • Doodlebug Sunkissed 6x6 Paper Pad
  • Copic Markers (Chick: Y13, Y18, YR14, YR18 - Puppy: E33, E57, E59, R29, R89 - Cow: C1, C3, C7, 0, E53, E33, R29, R89 - Kitty: YR61, YR14, YR68, C1, 0 - Shadow: C1, C3, 0)
  • Little B Washi Tape
  • Scotch Foam Tape 

Paper Smooches and Embossing Paste: How to Add Shimmer to Your Texture

Good evening!  Today I want to share another card featuring the Paper Smooches Spectrum stamp set.  I'm kind of obsessed with this unicorn.  The problem is real.  I just kept picturing her prancing through the clouds all full of whimsy and glitter and I simply had to make this dream a reality.
 

To do that, I started with a piece of watercolor cardstock cut down to A2 size (4.25"x5.5") and grabbed my Distress Inks in Picked Raspberry, Orange Marmalade, and Mustard Seed.  Originally this was going to be a top folding card but after I blended all those gorgeious colors together I just couldn't bring myself to cover up all that pink so I decided the sunset in whimsical Unicornland could go from side to side!  After I covered the whole piece with ink I spritzed some water in my hand and flicked it onto the color.  I let those droplets sit there for a minute or two and then dabbed them off with a paper towel (for more on this technique check out my last video).  The bleach spots that result are so awesome!!  This is a really easy way to add a wow factor to your watercolor backgrounds. 


 Once the background was complete I die cut some clouds using the Puffy Cloud Border Dies by Lawn Fawn and ran them through my Big Shot in the Cuttlebug Swiss Dots embossing folder for some added texture.  I've kind of been stuck on adding embossed polka dots these days.  I think it really takes a project to the next level.


At this point I started thinking that sky needed a little extra something and for some crazy reason I got all kinds of adventurous and busted out my white embossing paste and a Heidi Swap stencil and added some stars.  Now, I never use embossing paste and I rarely use stencils. I love when other people use them but I just never really know how to use them to the best of their ability so I just don't use them!  Well, I'm glad I stepped out of my comfort zone because I LOVE these stars!!!  To add that extra shimmer I used some Perfect Pearls in Perfect Gold and gently applied it to the wet embossing paste using a brush.  First I tried to mix the Perfect Pearls with the embossing paste but that was a major fail!  It lost all of it's shimmer and just turned a sludgy brown.  Oops!  


Finally I colored my unicorn friend using some Copic markers (colors below) and a yellow Stardust Gelly Roll pen for her horn.  I coated her with Wink of Stella (cuz it's a unicorn, duh she needs to sparkle!) and added some Close To My Heart Liquid Glass to her horn.  This product is the CTMH version of Glossy Accents and so far I've had really good luck with it.  I've found it doesn't add quite as much dimension but the shine is really pretty.  My sentiment is heat embossed in gold on some pretty pink cardstock I've had in my scrap bin since the dinosaurs.  Pop that front layer of clouds and that precious little pony up on some Scotch Foam Tape and you've got yourself a card!

Thanks so much for stopping by!  I hope you enjoyed this Paper Smooches fun!  If you haven't had a chance, check out my YouTube channel.  I just started making crafty videos and I'm really jazzed about it!  Have a fabulous evening and I'll see you back here soon!  Bye! 

~~~~~~~~~~~~~~~~~~~~~~~~~~

SUPPLIES
 

VIDEO Paper Smooches & TAWS: Rainbows & Sunshine

Hello and welcome!  Tonight I want to share this super cheerful card that I made using stamps from both Paper Smooches and The Alley Way Stamps.  I am really loving this stamp set Spectrum from Paper Smooches.  That unicorn just speaks to me!  And I thought it would be fun to combine her with the new Oh Splat set from The Alley Way Stamps. 


I used Distress Inks on watercolor cardstock to stamp a bunch of the splat images from TAWS and then spritzed them with water to make them even messier.  I wanted a loose watercolor rainbow background but with just a little more control then the paper smooshing technique allows and these big messy splat stamps were the perfect starting point.


The unicorn was left over from another project and is colored with Copic markers (all the colors I used are listed below) and popped up with foam adhesive. I used some Wink of Stella on his mane, tail, and hooves cuz unicorns gotta have glitter!  His horn is colored with a yellow Stardust Gelly Roll pen and then coated with a layer of Liquid Glass.  This is just like Glossy Accents but it is the Close To My Heart version. The sparkle on this card is brought to you by Pretty Pink Posh - love those Sparkling Clear sequins!  And the sentiment is from the Paper Smooches Spectrum stamp set as well.


I have listed all of the supplies used to make this card below.  If you'd like to see a more details on how I made this card please watch the video above and subscribe to my YouTube channel so you never miss a crafty moment!  Thanks so much for stopping by and have a great night!

~~~~~~~~~~~~~~~~~~~~~~~~~~~~~~~~~~~~~~~~~~~~~~~~~~~~~~~~~~~~~~~~~~~~~~~~~~

Supplies

  • Distress Inks in Picked Raspberry, Cracked Pistachio, Mermaid Lagoon, Mustard Seed, Orange Marmalade, and Seedless Preserves
  • Paper Smooches Spectrum Stamp Set
  • The Alley Way Stamps Oh Splat Stamp Set
  • Pretty Pink Posh Sparkling Clear Sequins in 6mm and 4mm
  • Scotch Foam Tape
  • Watercolor Paper
  • White Card Base from Close To My Heart 
  • Copic Markers (BG10, BG13, BG49, RV52, RV55, C1, C3, 0)
  • Close To My Heart Liquid Glass  
  • Gelly Roll Stardust Pens - Yellow 
  • Lawn Fawn Black Licorice Ink 
  • Wink of Stella

VIDEO Die Cut Hello & My First YouTube Video

Happy Sunday and welcome back to another card post!  I am super excited to be sharing my first YouTube video with you all tonight!  I am addicted to YouTube and have been known to spend countless hours watching "craft videos" as they are fondly referred to in my house.  I've wanted to be a part of it all for awhile now but being the non-tech savvy gal that I am I was a bit intimidated by the process of recording, editing, and posting a craft video of my own.  BUT I took the plunge and finally decided to edit a film that I shot a few weeks ago so I hope you all like it!  


This card is a little different for me since it involves very little stamping.  Usually I stick with stamping and coloring (LOVE TO COLOR!!!) but I really wanted to try the awesome new die cut from Spellbinders that I bought so I went with a card featuring mostly die cuts.  I'll let the video give you the details but I'll post all of the supplies that I used below.


Thanks so much for stopping by and I hope you'll subscribe to both my blog and my YouTube channel so you don't miss any of the crafty fun!  Have a fabulous evening!

~~~~~~~~~~~~~~~~~~~~~~~~~~~~~~~~~~~~~~~~~~~~~~~~~~~~~~~~~~~~~~~~~~~~~~~~~

Supplies